Help topics
- Purpose of the site
- Compass features
- Compass menu
- Compass or GPS - advantages and disadvantages
- Compass Test
- Draw a single or multi-legged route
- Extending the compass direction of travel arrow
- False readings when using a compass
- Fine Tuning the Set Compass
- Getting started with Set Compass
- Google Maps projection
- GPS or Compass - pros and cons for navigation
- Grid references test
- How to use a compass
- Import Google Map routes
- Latitude and longitude positions: degrees, minutes and seconds
- Magnetic declination or variation
- Magnetic declination or variation adjustment
- Magnetic declination or variation calculation
- Map projections
- Map reading
- Map reading skills test
- Menu
- Moving the Set Compass
- My Google Map Compass Routes
- Negative magnetic declination or variation
- New Features
- North: different types
- North on Google Maps
- Ordnance Survey Compass
- Ordnance Survey maps integration
- Ordnance Survey map projection
- Ordnance Survey map symbols
- Panning and Zooming with Google Maps
- Positive magnetic declination or variation
- Print Map Function
- Route drawing
- Route Information Display
- Safety
- Save and Store Set Compass Google Map Routes
- Single leg or multi-legged routes?
- Test your compass reading skills
- Tips
- Types of bearings
- Updates
- User Guide
- Watch as Compass
- What is a compass?
- What type of compass is used on the site?
- Zooming with Google Maps
User Guide

Getting Started with the Set Compass1. Open the application and select either Draw Single Leg or Draw Multi-Legged route: 2. Select a starting point using the Google Search Box and enter a city, town, place, or a latitude/longitude directly.
3. Clear the Google advertising that appears by clicking the Clear Results link. 4. Click on the  button button in the upper-right corner and select from the range of map styles and overlays available: button button in the upper-right corner and select from the range of map styles and overlays available:
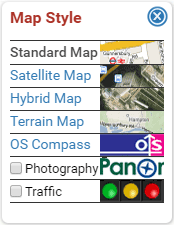 Click again to close the Map Style menu. The map style can be changed at any time whilst using the application.
Panning and Zooming with Google MapsPanningTo move the map click and hold the left mouse button and drag the map to a new place. 
You can also move the map North, South, East or West using the pan arrows. These can be found on the top left hand corner of the map. The central pan button resets or re-centres the map, returning to the last result. The map cannot be moved if the compass is showing. In this case, click the 'Hide Compass' button, move the map to the required position, then click 'Show Compass' which will return the compass to its last position. Zooming in and out - changing the scale  Google Maps has 17 different zoom levels. Each zoom level is made of a different style map shown at different scales, each one showing more or less detail. Some maps will be of the same style, but at a smaller or larger scale.
To see a map with more detail you need to zoom in. You can do this using the zoom bar on the left hand side of the map. Click the + sign on the top of the zoom bar. To centre and zoom in on a location, double click the location. To see a map with less detail you need to zoom out. To do this, click the - sign on the bottom of the zoom bar. As the scale changes the map will also change to show a different Google map, one which is more appropriate for the scale. The key to the Google Maps pan and zoom tools is shown below: 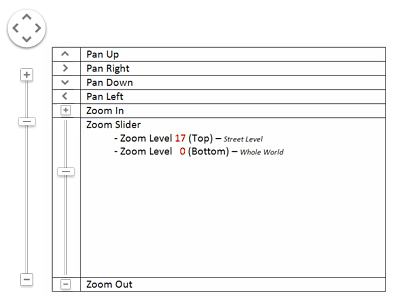 Centreing the map
Double click on a location to centre and zoom in. Tip Once the compass is opened the map scale cannot be adjusted without restarting the application. To restart, select the 'New Routes' option from the left side menu. Selecting and moving the Set CompassClick on the 'Show Compass' button that appears in the lower-left corner and the compass will appear on the map near your specified point. Drag the compass so that its centre sits on top of your starting point. Click on the compass to let you rotate it to the desired direction; click again to freeze it.
Fine tuning the compass bearing A digital readout of the compass bearing appears in red in the top right hand corner of the map.The compass can be adjusted and fine tuned by entering the number of degrees in the box and then pressing the 'Enter' key on your keyboard. 
Once the compass is opened the map scale cannot be adjusted without restarting the application. To restart, select the 'New Routes' option from the left side menu. Fine Tuning the Set CompassA digital readout of the compass bearing appears in red in the top right hand corner of the map. The compass can be adjusted and fine tuned by entering the number of degrees in the box. Press the Enter key on your keyboard to effect the change. The example below shows the map bearing of 96º highlighted in the top right corner in preparation for changing. Enter a new bearing then press the keyboard Enter key.
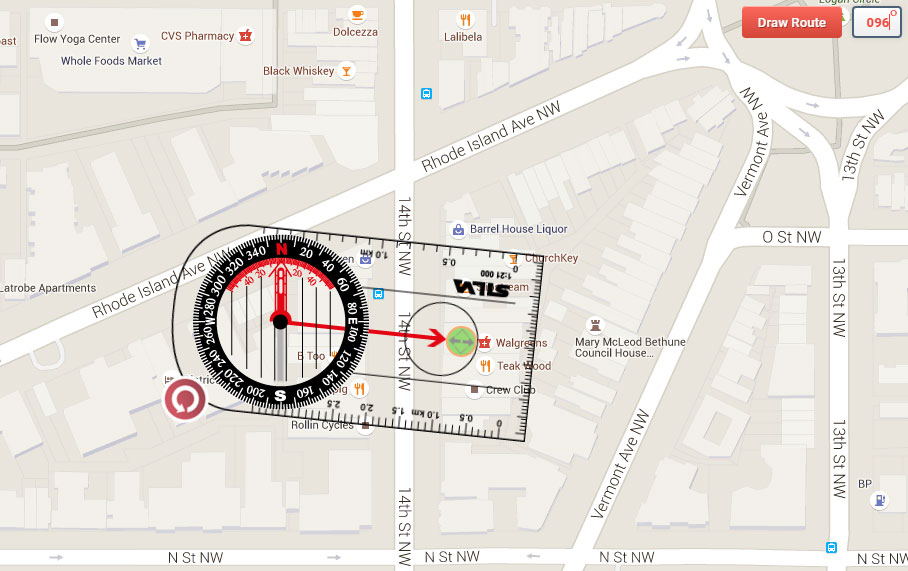
Fine tuning the compass
Set Compass MenuWhen the compass is opened, a Menu Button appears at the top left of the map that lets you:
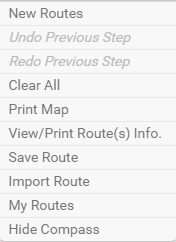 To open the menu, put your mouse over the 'Compass Menu' button.
Move your mouse out to close the menu. The Menu button disappears when the 'Hide Compass' button is selected. Click the 'Show Compass' button to restore. Extending the Compass direction of travel arrowThe minimum route leg distance currently available at maximum zoom level using the Set Compass is approximately 30 metres. Increasing the route leg distance at this zoom level requires the extension of the direction of travel arrow and assists in obtaining a more accurate bearing as well as recording an accurate distance for the route leg.There are two methods available for extending the Compass direction of travel arrow: manually and using a slider. Both options are provided in the left-hand menu and are illustrated below. Direction of Travel Arrow Manual Resize Drag the compass so that its centre sits on top of your starting point. Select Resize Arrow Manually from the menu and a green circle appears at the end of the red Direction of Travel arrow on the compass. Adjust the length of the arrow by dragging the green circle. When it is at your desired destination, click the End Resizing button. Click the Draw Route button that then appears at the top right of the map. 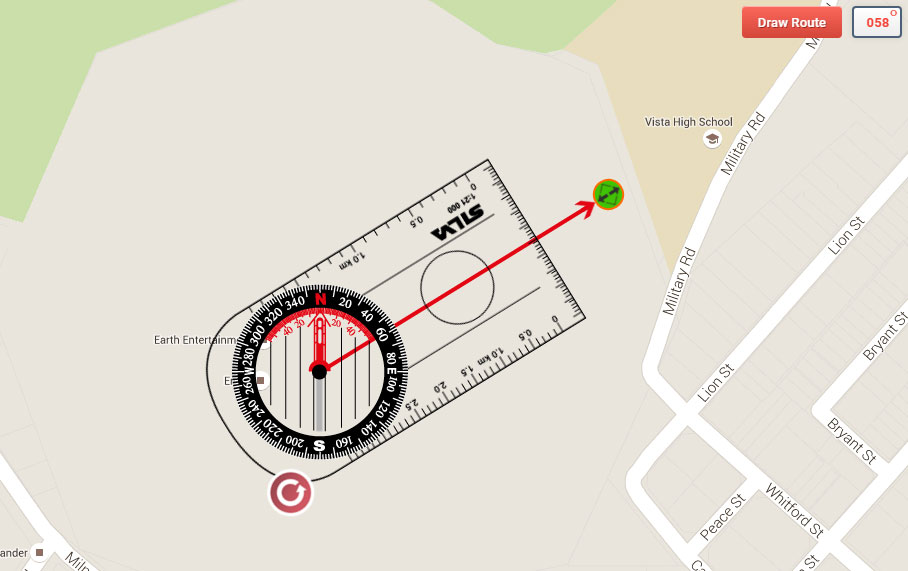
Manual resizing of the Set Compass direction of travel arrow Set Compass Route DrawingClicking on the 'Draw Route' button will plot and draw a route to a marker at your selected point of destination and display:
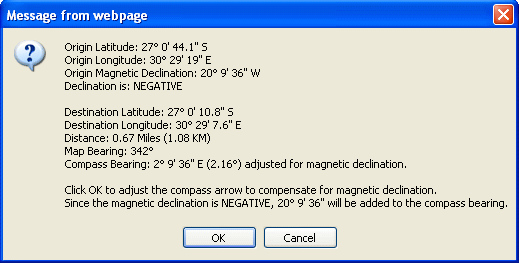 Clicking 'OK' on the display will adjust the red compass direction of travel arrow to compensate for magnetic declination. The compass bearing display adjusted for magnetic declination (12.34º in the above example) will appear in the lower right corner.
The map or true bearing display appears in the upper right corner (342º in this example). 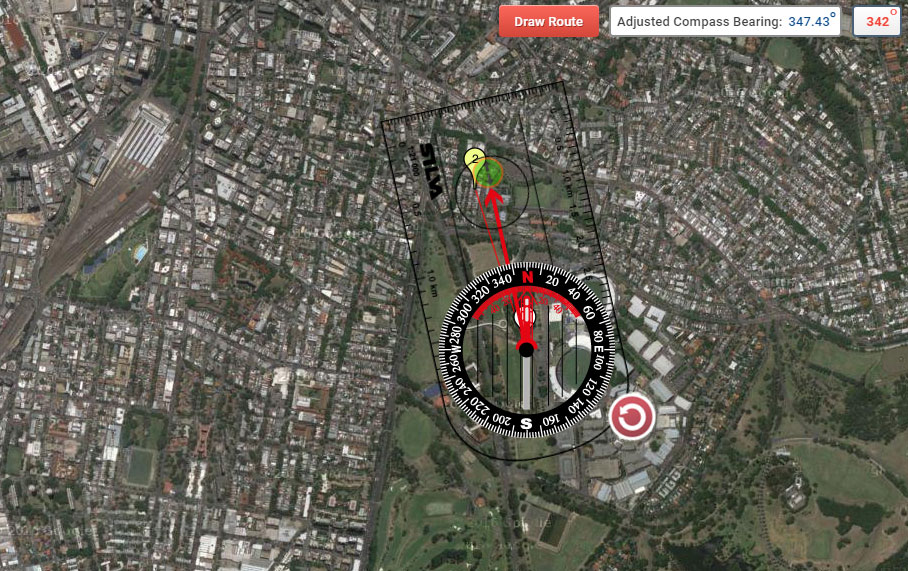 Clicking 'Cancel' will leave the red direction of travel arrow unadjusted, and no compass bearing display will appear in the lower right corner.
For Multi-Legged routes, click the 'Move to Next Point' button to move the compass to the next point: 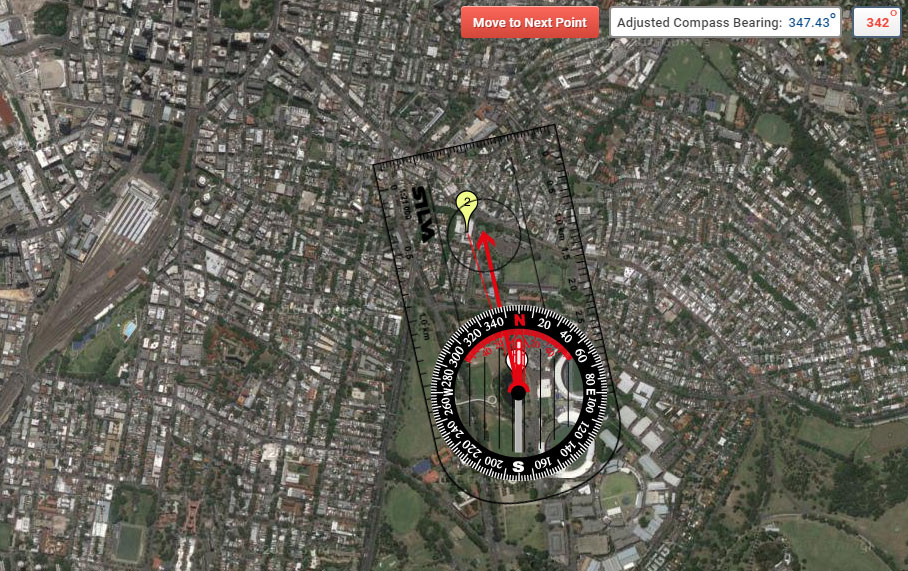 Once you have finished, you can hide the compass, save and print your route:
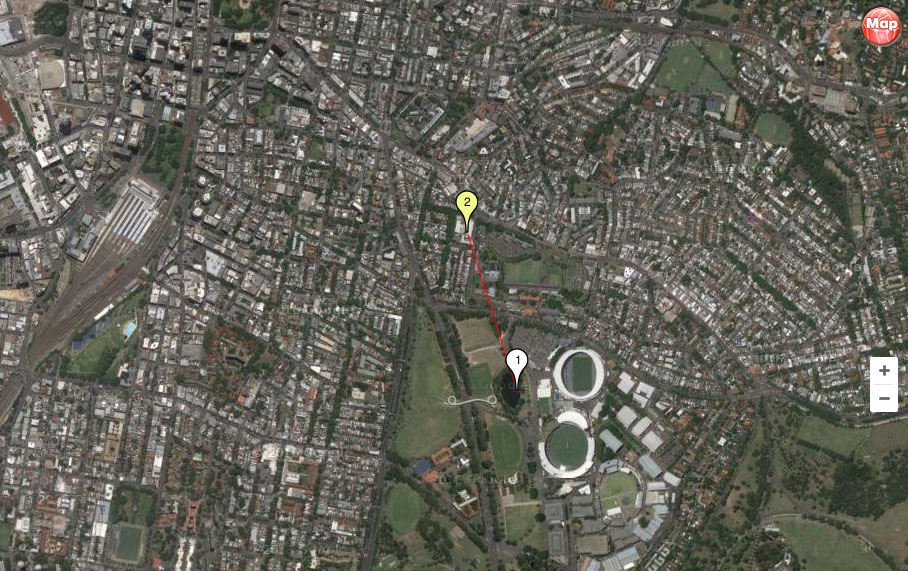
Set Compass Route Information DisplayClicking on the 'Draw Route' button at the upper right of the map will display a wide range of route information including coordinates, map and compass bearings, magnetic variation or declination and distance: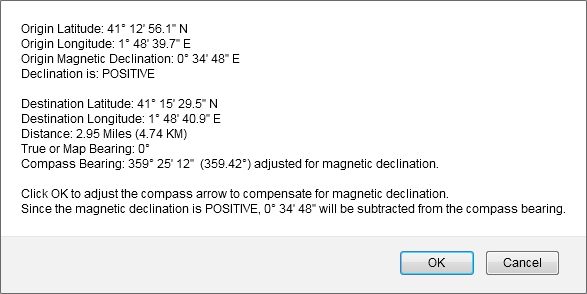
Set Compass route information
Clicking on the Route Markers will display route leg information: 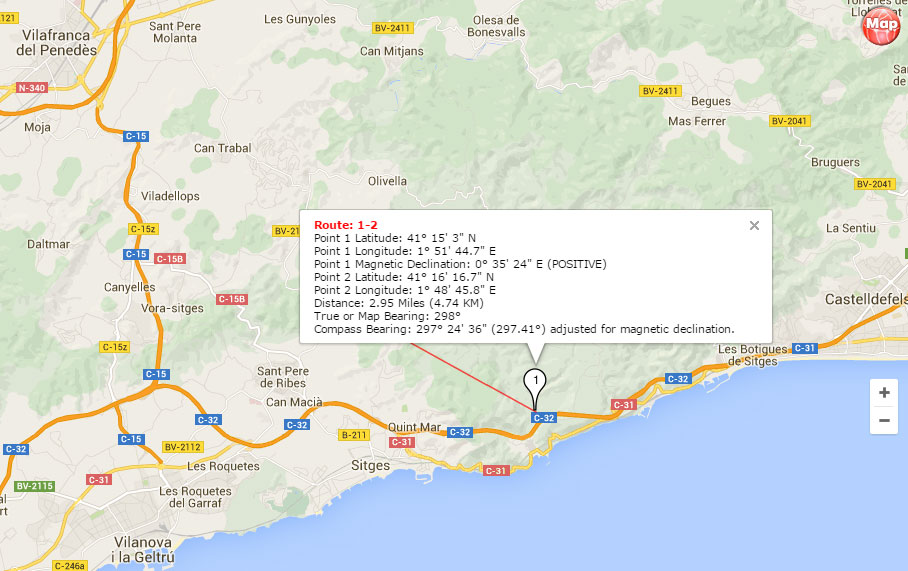
Route Marker information
The latitude and longitude are provided for the last route marker: 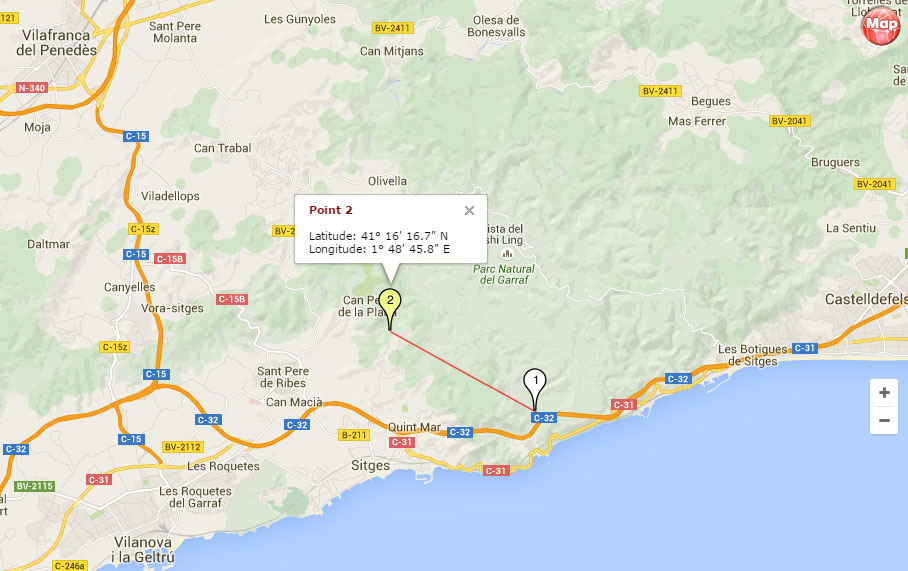
Coordinates for the last route marker
The View/Print Route(s) Information function in the menu provides a route summary: 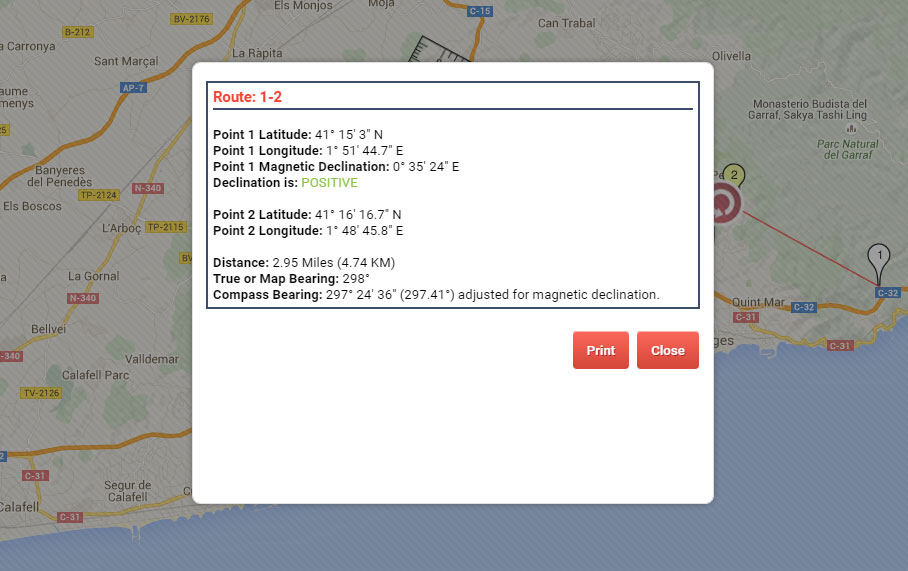
View/Print Route(s) Information summary
Tip Click the 'Hide Compass' button before clicking on the route markers. Print Google Map RoutesThe Set Compass function prints large route maps by automatically centreing the map on the plotted route(s) and cropping the map into horizontal 'slices' which are then further cropped into printable 'tiles'. This overcomes the common failure of printers to handle large images, particularly map areas that lie outside of the immediate screenshot. To retain detail, the printable map is not reduced in size or resolution.How is the size of each slice defined? The maximum slice width is 960PX and the maximum height is 600PX. The Print Map function will try to create the slice with this width and height and if there is not enough space in the image, it will crop up to the end of the image width and height. Changing Print Resolution The Print resolution is controllable from the user end (Printing settings). The Set Compass Print Map function gives the user printable slices in the same Google Maps resolution without shrinking the image width/height. We recommend a printer setting quality of 300 dpi or higher for best print results. Changing Printer Layout to Landscape Orientation Landscape page orientation is where the page is turned sideways, so the horizontal dimensions are longer than the vertical. Printers are programmed to print in 'Portrait Orientation' by default, with text printed lengthways down a page orientated with its vertical dimensions longer than the horizontal. Since the printable map tile horizontal widths are greater than their heights (960PX * 600 PX), we recommend that users select 'Landscape Orientation' from their Printer Preferences options. Example An online Set Compass plotted routes example shows four routes 1-2, 3-4, 5-6, and 7-8, which have been automatically cropped into six printable slices or tiles. To print, these routes should first be imported as ID 141: Set Compass Print Preview Example. Option boxes appear next to each map segment, allowing printing to be deselected if not required. 
Set Compass Print Preview Example
If the Print Preview window does not appear, you will need to disable your browser popup blockers for this site. Save and Store Set Compass Google Map RoutesTo save a Set Compass Google Map route, the 'Save Route' option should be selected from the upper left menu. The menu becomes hidden if the 'Hide Compass' button is activated.
The menu becomes hidden if the 'Hide Compass' button is activated
To view the menu, reopen the compass by clicking the 'Show Compass' button. This activates the menu and returns the compass to its last location. 
Multi-Legged route with the menu visible
Select the 'Save Route' option on the menu. A dialogue box opens with optional route title, route description and email fields. 
The 'Save Route' dialogue window
The saved route is stored using a unique ID reference/URL. An email containing the URL is sent to the email address provided. The route ID/URL allows a user to access/import it later. The email address can be used to login to the 'My Routes' menu option and access a list of stored routes. 
The saved route is stored using a unique ID reference/URL
Import Set Compass Google Map RoutesNew legs can be added at any time to a Google Map route through the Import Route option selected from the upper left menu. The ID number provided when the route was saved should be entered in the Import Route dialogue window.
The import map route dialogue window
The route is opened in the same map style used at the time of saving - in the example below as a Terrain Map. 
Route 181 opened as a Terrain Map
To switch to another map style, click the 'Hide Compass' button and then select from the map menu which will appear in the upper right. 
Select from the map menu in the upper right
The aerial map option can be selected and clicking the 'Show Compass' button will return the compass to its last position. New route legs can then be added. 
The 'Show Compass' button will return the compass to its last position Ordnance Survey Maps CompassOrdnance Survey Maps have been integrated within the Google Map Compass tool. Ordnance Survey Compass overlays an interactive compass on an Ordnance Survey Map that matches the UK Google Map location. Ordnance Survey Map routes can then be plotted, with compass bearings, grid references, latitude and longitude coordinates, distances and magnetic variation or declination recorded.
Ordnance Survey Maps Compass
The Ordnance Survey Compass integrated link can be found in the map style menu: 
The Ordnance Survey Compass integrated link
If the Google Map location lies outside the UK, the Ordnance Survey Compass will load its default location centred on Lyndhurst, Hampshire. Ordnance Survey Compass Set Compass Google Map Tips1. Use the 'Maximize This Map' option to generate a large map window to work with - it makes things a lot easier.2. The current view of the map can be panned to a new position by pressing the left mouse button and dragging the map. 3.After saving a route and closing the Compass Tool, new legs may be added later by importing the route using the 'Import Route' menu button. 4. Bearings are given in both absolute map numbers, and compass-corrected for the local magnetic declination value, which is also listed. If your compass lets you adjust the magnetic declination, you have the option to do that and use the uncorrected map bearings. Set Compass CreditsMap ServiceThe Set Compass Web Application has been built on and is powered by the Google™ map service and the Google™ data feed. Application Developer and Software Architect Wessam Raafat Rady El Mahdy http://www.newvitalsoft.com My Google Map Compass RoutesThe email address used when saving a route can be used to login on the 'My Routes' dialogue window to retrieve a list of stored Google Maps compass routes.
My Google Maps compass routes dialogue window The retrieved Google Maps compass routes list includes the route ID, title, description, URL and the date created. 
Google Maps compass routes list
1. Open the application and select either
Draw Single Leg or Draw Multi-Legged route 
2. Select a starting point using the Google Search Box and enter a city, town, place, or a latitude/longitude directly. 3. Clear the Google advertising that appears by clicking the Clear Results link.
4. Click on the
 button button in the upper-right corner and select from the range of map button button in the upper-right corner and select from the range of map styles and overlays available: Click again to close the Map Style menu. The map style can be changed at any time whilst using the application. 
5. Drag the Google Maps zoom slider tool to select the
required map scale. The map scale cannot be adjusted after this stage without restarting the application. 
6. Click on the 'Show Compass' button that appears in the lower-left corner and the compass will
appear on the map near your specified point. 
7. Drag this compass so that its centre sits on top of your starting point. 8. Click on the compass to let you rotate it to the desired direction; click again to freeze it. A digital readout of the compass bearing appears in red in the top right hand corner of the map. The compass can be adjusted and fine tuned by entering the number of degrees in the box. Press the Enter key on your keyboard to effect the change. 
9. In the upper-left corner, a Menu Button will have appeared that lets you:
 To open the menu, put your mouse over the 'Compass Menu' button.
Move your mouse out to close the menu. 10. Change the length of the compass red direction of travel arrow by slider or by manual dragging so that its end is at your desired destination.
11. In the upper right corner, the 'Draw Route' button shows up, together with the unadjusted compass or true bearing display.

The 'Draw Route' button replaces the 'Map Style' button: 
The 'Map Style' button reappears when the 'Hide Compass' button is selected:

The 'Menu' button disappears when the 'Hide Compass' button is selected. Click the 'Show Compass' button to restore. 12. Clicking on the 'Draw Route' button will plot and draw a route to a marker at your selected point of destination and display:
 Clicking 'OK' on the display will adjust the red compass direction of travel arrow to compensate for magnetic declination. The compass bearing display adjusted for magnetic declination (12.34º in the above example) will appear in the lower right corner.
The map or true bearing display appears in the upper right corner (342º in this example).  Clicking 'Cancel' will leave the red direction of travel arrow unadjusted, and no compass bearing display will appear in the lower right corner.
For Multi-Legged routes, click the 'Move to Next Point' button to move the compass to the next point:  Once you have finished, you can hide the compass, save and print your route:

...and View/Print the route information and maps: View the route information 
Clicking on the start or intermediary route point marker displays its latitude and longitude position as well as the map bearing, distance to the next marker and the compass bearing adjusted for magnetic declination. 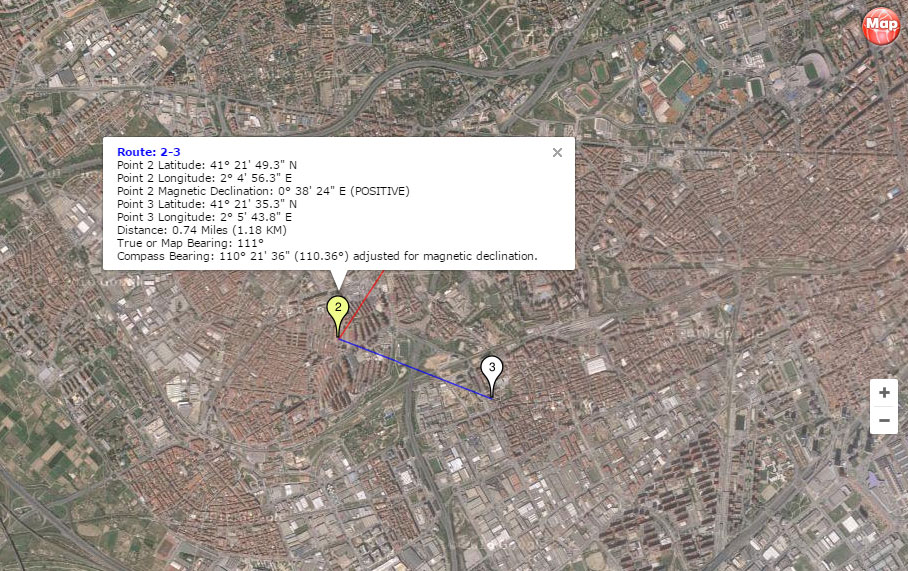
Clicking on the last route point marker displays its latitude and longitude: 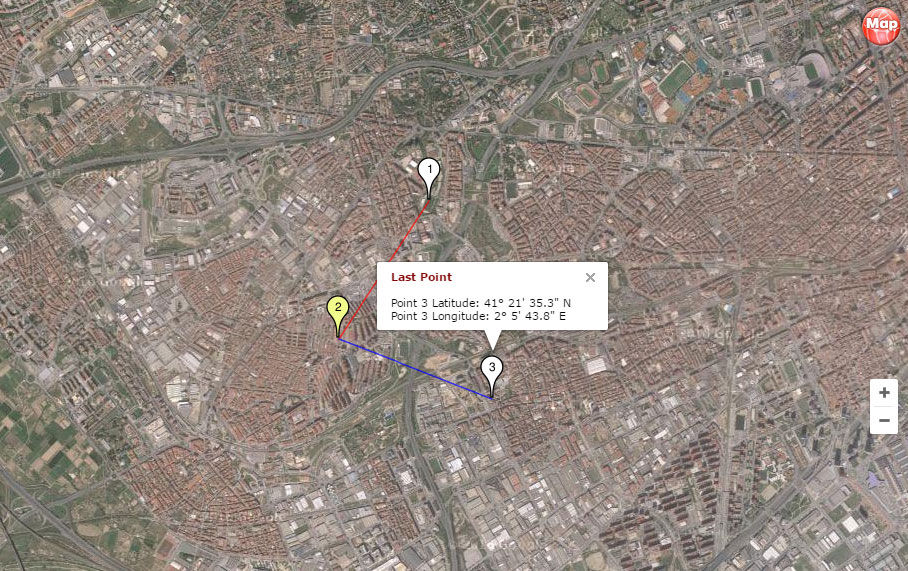
14. Now save your route using the 'Save Route' menu option. You will be provided with a unique route ID/URL and have the option of having this emailed to you. The route ID/URL allows you to access/import it later. 15. Providing your email address at the time of saving your route ensures you can access your routes online at anytime using the 'My Routes' menu option. Your email address is the only identification you will need to access all your saved routes. Tips 1. Use the 'Maximize This Map' option to generate a large map window to work with - it makes things a lot easier. 2. The current view of the map can be panned to a new position by pressing the left mouse button and dragging the map. 3. Bearings are given in both absolute map numbers, and compass-corrected for the local magnetic declination value, which is also listed. If your compass lets you adjust the magnetic declination, you have the option to do that and use the uncorrected map bearings. |
Getting Started Panning and Zooming Moving the Compass Compass Fine Tuning Compass Menu Arrow Resize Draw Single Leg Route Draw Multi Leg Route Route Information Print Route Save Route Import Route My Routes Ordnance Survey Helpful Tips Single Page Credits |
Copyright © 2009 - 2026 All Rights Reserved
Barcelona Field Studies Centre S.L.
Barcelona Field Studies Centre S.L.